SmartFair Attendee App Setup Requirements
We’re excited to feature the SmartFair Attendee App for your upcoming college fair. The app provides students, families, and counselors with an easy way to access event information, view participating colleges, receive announcements, and navigate the fair. To ensure everything is set up correctly and branded for your organization, please follow the steps below.
Global Configuration - Branding
Purpose: Personalize your fair’s app experience with your organization’s logo, colors, font, and more.
Customize SmartFair App Branding
- Log in to the GoToCollegeFairs Customer Portal.
- From the left-hand navigation menu, select Global Configuration.
- Scroll down to the Attendee Mobile App Configuration section and click Configure.
- On the configuration screen, customize your attendee app branding as desired.

Note: Changes made in Global Configuration apply to all of your events. These settings are global and are not specific to a single event.
Preview Your Changes
As you make updates, use the App Preview panel on the right side of the screen to see how your changes will appear in the attendee app. You can also switch between different smartphone models to preview the app on various device types.
Customize Each App Screen
Use the navigation bar at the top of the page to move between the available app screens and customize each one before launching your app:
- Pre-Launch
- Login
- OTP (One-Time Passcode)
- Fair Listing
- App Home
Event Configuration
The following attendee app elements are configured at the event level and are located under Event Configuration.
- From the left-hand navigation menu, click Event Configuration.
- Use the search bar to locate the event you want to update.
- Click the event row to open the Event Overview page.
- At the top of the page, select the Attendee Mobile tab.
- From the sub-navigation menu, click Fair Content.
Within Fair Content, you can update the following event-specific elements:
- Fair Information
- Bus Schedule
- Announcements
- College Fair Map
- Our Partners
- Workshops
Fair Information
Purpose: Share the date and time windows the fair is open to attendees.
- Click Add Hours.
- Enter the Date, Start Time, and End Time for the fair session.
- If your event has multiple sessions on the same day (for example, a morning session and an afternoon session), click Add Hours again and enter the same date with the start and end times for the additional session.
- Repeat this process for any additional sessions or event dates.
- Click Save Fair Hours to apply your changes.
Bus Schedule
Purpose: Share high school bus schedules with attendees directly in the app.
Option 1: Add Schools Manually
- Click Add School.
- Complete the form by entering the school's information, including the Arrival Time and Departure Time.
- Click Add Row.
- Repeat these steps for each additional school.
Option 2: Import a Spreadsheet
- Click Import.
- Select your spreadsheet and click Continue.
- On the Field Mapping page, map each column in your spreadsheet to the corresponding target field in the system.
- Click Continue to Review.
- Review the import results. Any rows containing errors will be flagged for your attention. To correct a row, click the Pencil icon, make the necessary changes, and save your updates.
- (Optional) Map each school to its CEEB Code. While this step is not required, it is recommended if you plan to send announcements targeted to attendees from specific schools.
- When you are satisfied with the review, click Import in the bottom-right corner to complete the import.
Announcements
Purpose: Keep attendees informed during the fair with reminders, updates, and special notices.
Click Create Announcement.
Enter the Announcement Title and Message. You can also add an Image.
When you're finished, click Continue.
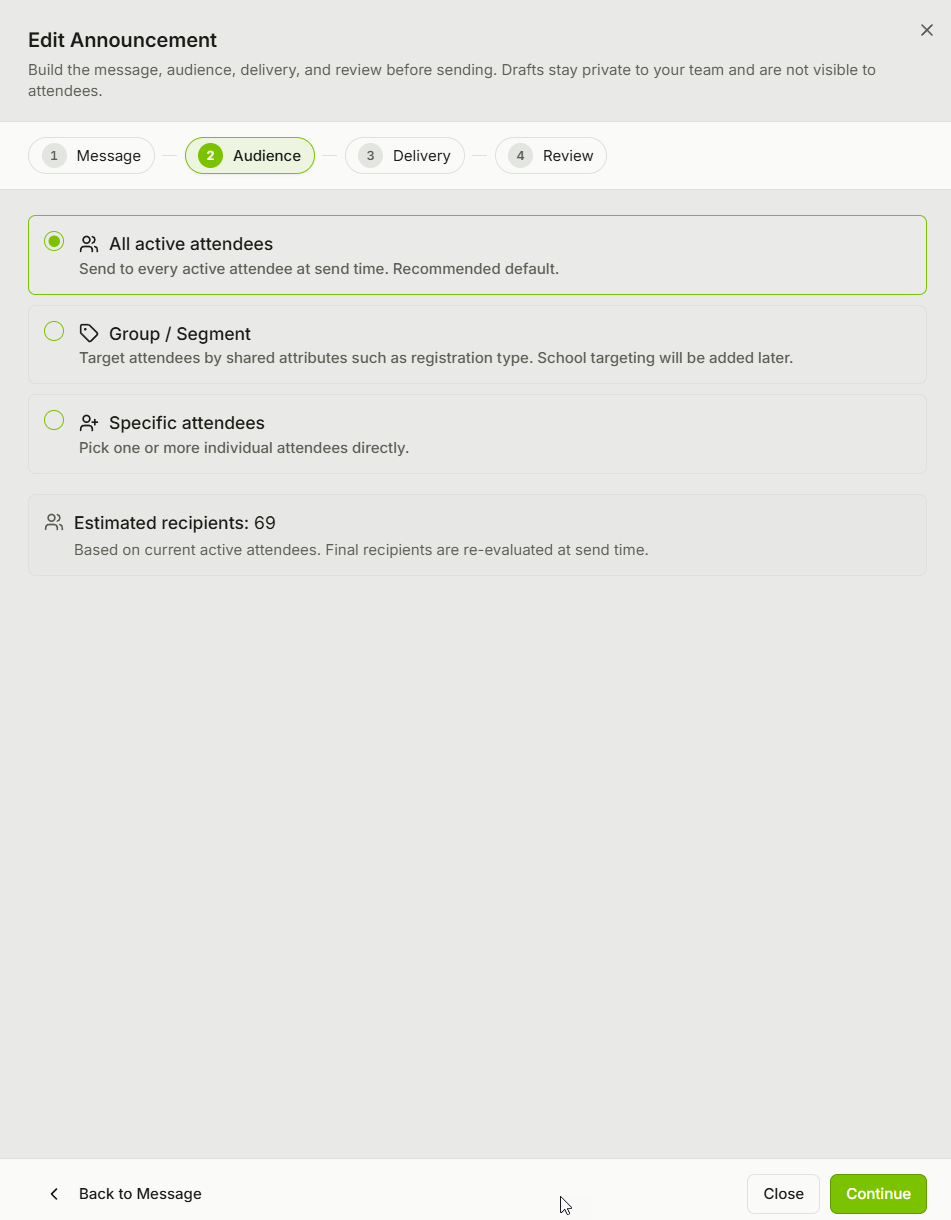
Select Your Audience
Choose who should receive the announcement. You can send it to:
- All attendees
- A specific attendee group or registrant type
- Individual attendees that you select
After choosing your audience, click Continue.
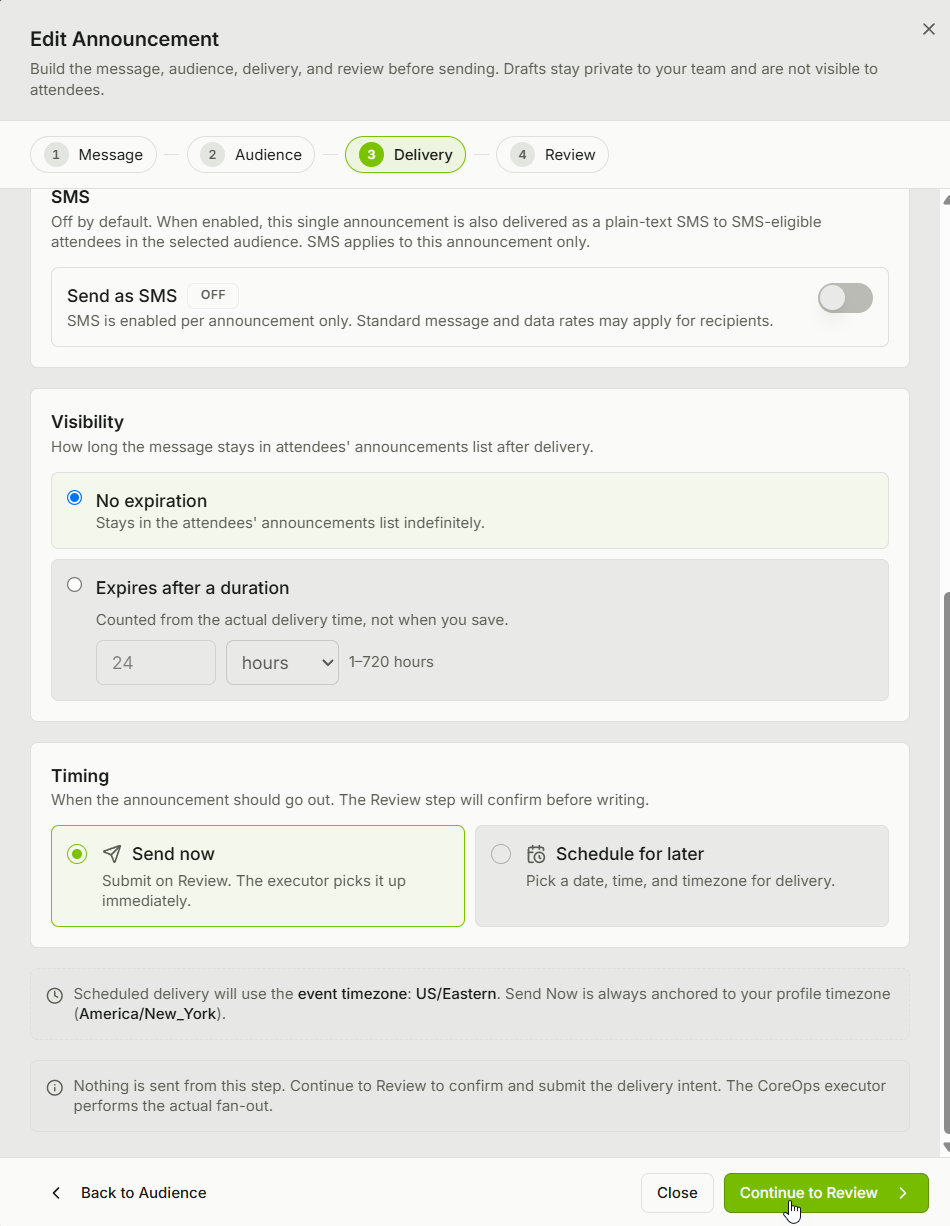
Configure Delivery Settings
By default, announcements are:
- Displayed in the Announcement Feed
- Sent as a push notification to attendees who have enabled push notifications
You also have the option to enable SMS delivery, which is turned off by default.
Set Visibility and Send Options
- Choose whether the announcement should remain visible indefinitely or expire after a specified date and time.
- Decide whether to:
- Send the announcement immediately, or
- Schedule it to be sent at a later date and time.
Click Continue to review your announcement.
Review and Send
Review all of the announcement details. If everything looks correct, you can:
- Click Save as Draft to finish it later, or
- Click Send to publish the announcement immediately or schedule it based on your selected delivery time.
College Fair Map
Purpose: Display an interactive map of the college fair with booth numbers and other informational icons to help students navigate the fair.
- Click Upload Fair Map to upload your map file. You’ll have the ability to crop, rotate, and enhance the image, so don’t worry if your map needs some editing. Once your map is uploaded, click Continue.
- Use the Crop & Rotate button to adjust your map as needed. You can crop out unwanted areas or rotate the image to the correct orientation. When you’re finished, click Continue.
- The next step is AI Enhancement. This makes your map sharper and improves the legibility of text that may appear blurry. Don’t worry—you can always undo the enhancement and return to the original image. When you’re satisfied, click Continue.
- Add custom markers to your map by clicking anywhere on the map. You can add markers for entrances, information desks, restrooms, or anything else attendees may need to find. Markers appear as live overlays in the attendee app, and you can customize the icon, text, and color. Click Continue when finished.
- In the Booths step, click the Detect booths button to automatically detect booth numbers on the map and match them with the booth numbers in your exhibitor information. This pairs each exhibitor with their relevant booth so students can see which exhibitor is located at each booth when interacting with the map in the app.
- Review the detected booth markers and make any necessary adjustments. You can move, add, delete, or relabel booths until the overlay accurately matches the printed map. Once approved, the booth information will be live for attendees.
- Click Continue to complete your fair map setup.
Our Partners
Purpose: Our Attendee Mobile App provides great sponsorship opportunities to help brands connect with event attendees.
If you have Swoogo access: Adding Sponsors
To add a single sponsor to your event:
- Log in to Swoogo and navigate to your event.
- Navigate to Event Setup > Sponsors
- Click +Add Sponsors > Add Single Sponsor.
- Fill out all of the desired sponsor details.
- Click Save.

Once all of your sponsors have been added to your event in Swoogo, follow these steps to complete the remaining event configuration in the GoToCollegeFairs Customer Portal.
- Log in to the GoToCollegeFairs Customer Portal to complete the remaining steps in your event configuration, similar to the Content section.
- From the navigation menu, select Our Partners.
In the Our Partners section, you can manage how each sponsor appears in the app.
- Show in App: Toggle this setting on or off to control whether the partner is visible in the app. Partners are hidden by default.
- Partner Level: Select the appropriate partner level: Standard, Premium, or Ultra. For more information about the differences between partner levels and suggested pricing tiers, view this article.
If you do not have Swoogo access:
- Please send the following Sponsor details to your Program Manager:
- *Logo
- *Institution Name
- Sponsorship Level
- Description
- URL
- Other applicable information
Workshops/Sessions
Purpose: Share session or workshop details with attendees directly in the app.
If you have Swoogo access: Adding Sessions
If you have Swoogo access: Adding Sessions
- Log in to Swoogo and navigate to your event.
- Go to Event Setup > Sessions > Import Sessions.
- Use the Fair Schedule - Import Template attached at the bottom of this article to fill out your session information.
- Select your import file.
- Make sure the checkbox for “This spreadsheet has headings in the first row” is checked.
- Click Continue — the file should automatically map correctly as long as you didn’t change the headings from the import template.
- Proceed with your import and you're good to go!
If you have Swoogo access: Adding Speakers
- Log in to Swoogo and navigate to your event.
- Go to Event Setup > Speakers > Add Single Speaker.
- Fill out the speaker’s details.
- Be sure to select the session they are associated with.
- Click Save.
Once all of your sessions/workshops have been added to your event in Swoogo, follow these steps to complete the remaining event configuration in the GoToCollegeFairs Customer Portal.
- Log in to the GoToCollegeFairs Customer Portal to complete the remaining steps in your event configuration, similar to the Content section.
- From the navigation menu, select Workshops.
In the Workshops section, you can manage how each sponsor appears in the app.
- Display in App: Toggle this setting on or off to control whether the session is visible in the app.
- After a session ends: Select how long an ended session stays visible on the attendee Workshops page.
If you do not have Swoogo access:
- Please send the Fair Schedule - Import Template (attached at the bottom of this article) to your Program Manager.
- Please send the following Speaker details to your Program Manager:
- *Email Address
- *Name
- Job Title
- Institution Name
- Bio
- Profile Picture
- Session(s) they are presenting